
1. Access User Management
- Log in to FleetConnect with your administrator account.
- Navigate to Admin → Manage User and Drivers.
- Confirm you have administrator rights to manage users.
2. Locate the Driver
-
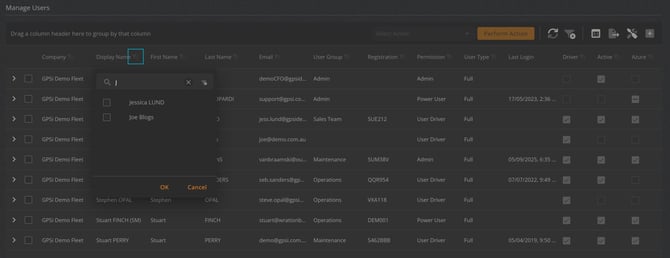
In the Manage Users table, use the filter icon on the Name or Email column.
-
Enter the driver’s details to narrow the list.
-
Click the driver’s row to open the Edit Driver screen.
3. Open the DriverID Section
- In the Driver Settings, locate the DriverID Section.
- If the driver already has a DriverID tag assigned, the existing tag number will appear here.
4. Assign the DriverID Tag (RFID/NFC)
- Enter the RFID/NFC tag number exactly as printed on the fob.
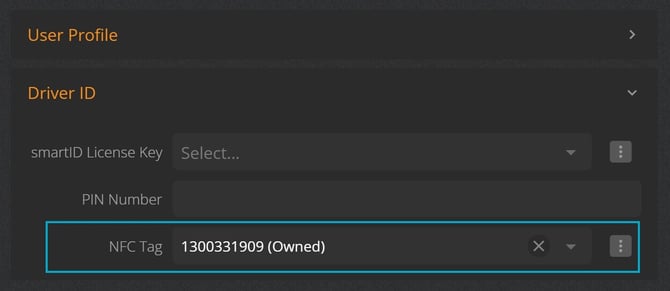
- Confirm the tag is unique and not already assigned to another driver.
- If replacing an old tag, overwrite the previous tag value.
5. Save the Update
-
Click Save to apply the change.
-
The RFID/NFC tag is now linked to the driver and ready for use.
What Happens After Assignment
Once saved, FleetConnect updates the driver’s identity profile:
- The RFID tag becomes the driver’s primary physical identifier for vehicle access and Driver ID events.
- Any vehicle equipped with RFID readers will automatically attribute trips, logins, and Driver ID changes to this driver when the tag is used.
- Automated trip assignment rules will use the RFID tag to ensure accurate driver attribution for utilisation, behaviour, odometer, fuel, and event reporting.
- If a poolcar booking or manual Driver ID override occurs, those will take precedence over RFID detection.